10.4 Leq calculation
The measurement includes the time-weighted sound level Lp and all calculated values (Leq, LIeq, Leq,mov, LE, Lmax, Lmin, LN, Lpeak, Ltm5).
1Touch [Menu] on the measurement screen.
![Touch [Menu] on the measurement screen.](../images/10/04_img_1.png)
The [Menu] screen appears.
2Touch [Measure] on the [Menu] screen.
![Touch [Measure] on the [Menu] screen.](../images/10/04_img_2.png)
The [Measure] screen appears.
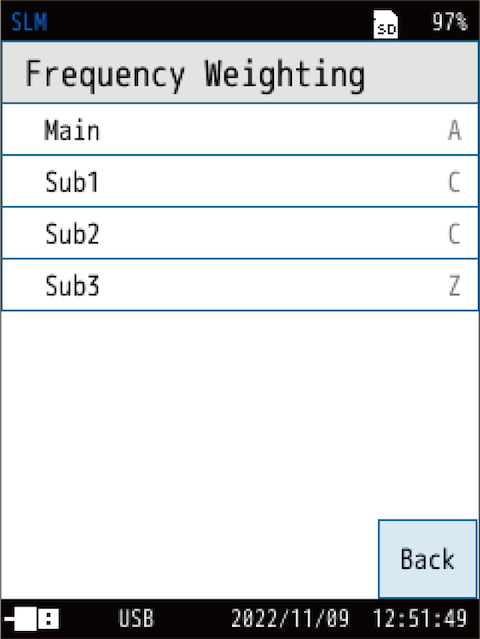
3Touch [Frequency Weighting] on the [Measure] screen.
![Touch [Frequency Weighting] on the [Measure] screen.](../images/10/04_img_3.png)
The [Frequency Weighting] screen appears.
Note
- The [Frequency Weighting] screen can also be displayed by touching [Freq. Weight] on the menu ring.
4Touch the channel to use, and select the frequency weighting.
| Item | Description |
|---|---|
| A | Sets A-weighting. |
| C | Sets C-weighting. |
| Z | Sets Z-weighting. |
For details on each item, see “Frequency Weighting” .
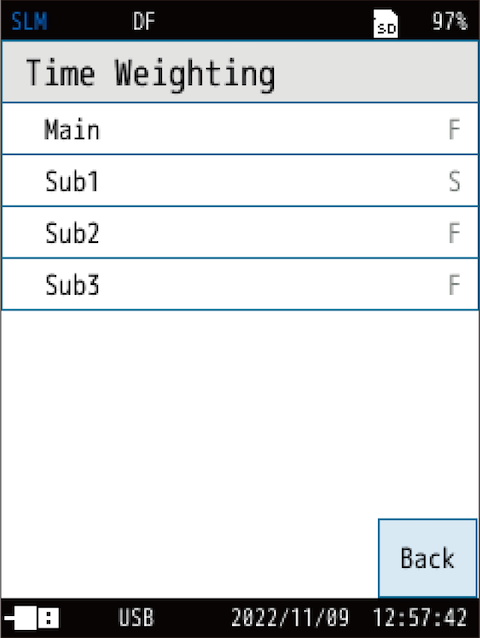
5Return to the [Measure] screen, and touch [Time Weighting].
![Return to the [Measure] screen, and touch [Time Weighting].](../images/10/04_img_5.png)
The [Time Weighting] screen appears.
Note
- The [Time Weighting] screen can also be displayed by touching [Time Weight] on the menu ring.
6Touch the channel to use, and select the time weighting.
| Item | Description |
|---|---|
| F | Sets F (fast). |
| S | Sets S (slow). |
| I |
Sets I (impulse). |
For details on each item, see “Time Weighting” .
Note
- The device uses high-speed sampling (20.8 µs) data for the sound pressure waveforms for Leq, LE and Lpeak calculation, and so it is not affected by time weighting.
7Return to the [Menu] screen, and touch [Display].
![Return to the [Menu] screen, and touch [Display].](../images/10/04_img_7.png)
The [Display] screen appears.
8Touch [Bar Graph] on the [Display] screen.
![Touch [Bar Graph] on the [Display] screen.](../images/10/04_img_8.png)
The [Bar Graph] screen appears.
9Touch [Upper Range] or [Lower Range], and then select a value.
![Touch [Upper Range] or [Lower Range], and then select a value.](../images/10/04_img_9.png)
| Item | Description |
|---|---|
| Upper Range | Select the upper limit (dB) of the bar graph. The value that can be set is 70 dB to 130 dB in 10 dB increments. |
| Lower Range | Select the lower limit (dB) of the bar graph. The value that can be set is 20 dB to 60 dB in 10 dB increments. |
Note
- The [Bar Graph] screen can also be displayed by touching [Range] on the menu ring.
- The default setting of 30 dB to 130 dB will suffice if neither AC output, DC output, nor waveform recording function (when NX-43WR is installed) is used.
- To make the bar graph display easier to see, set the upper and lower limits of the bar graph so that the measured sound pressure level comes near the center of the graph.
10Return to the [Display] screen, and touch [Leq Calc.].
![Return to the [Display] screen, and touch [Leq Calc.].](../images/10/04_img_10.png)
The [Leq Calc.] screen appears.
11On the [Leq Calc.] screen, set the amount of calculation displayed on the measurement screen to [On].
![On the [Leq Calc.] screen, set the amount of calculation displayed on the measurement screen to [On].](../images/10/04_img_11.png)
The setting switches between turning on/off each time you touch.
| Item | Description |
|---|---|
| On | Displays the calculated value of the target on the measurement screen. |
| Off | Does not display the calculated value of the target on the measurement screen. |
Note
- Leq calculation (statistical calculation for a certain interval, Leq, LIeq, Leq,mov, LE, Lmax, Lmin, LN, Lpeak and Ltm5) is measured at the same time. This setting sets the calculated values you want to display.
12Return to the [Menu] screen, and touch [Store].
![Return to the [Menu] screen, and touch [Store].](../images/10/04_img_12.png)
The [Store] screen appears.
13On the [Store] screen, touch [Store Mode].
![On the [Store] screen, touch [Store Mode].](../images/10/04_img_13.png)
14Select the store mode from [Manual], [Auto], [Timer Auto] and touch [Apply].
![Select the store mode from [Manual], [Auto], [Timer Auto] and touch [Apply].](../images/10/04_img_14.png)
For details, refer to “Store Operations”
15On the [Store] screen, touch [Meas. Duration].
![On the [Store] screen, touch [Meas. Duration].](../images/10/04_img_15.png)
| Item | Description |
|---|---|
| 10s | Select a measurement time. |
| 1m | |
| 5m | |
| 10m | |
| 15m | |
| 30m | |
| 1h | |
| 8h | |
| 24h | |
| User Setting | In [Meas. Duration], if you select [User Setting], [User Setting] appears on the [Store] screen, and you can set the measurement time to a time of your choice. In Manual mode, the maximum time that can be set is 24 hours. |
16Select a measurement time, and touch [Apply].
![Select a measurement time, and touch [Apply].](../images/10/04_img_16.png)
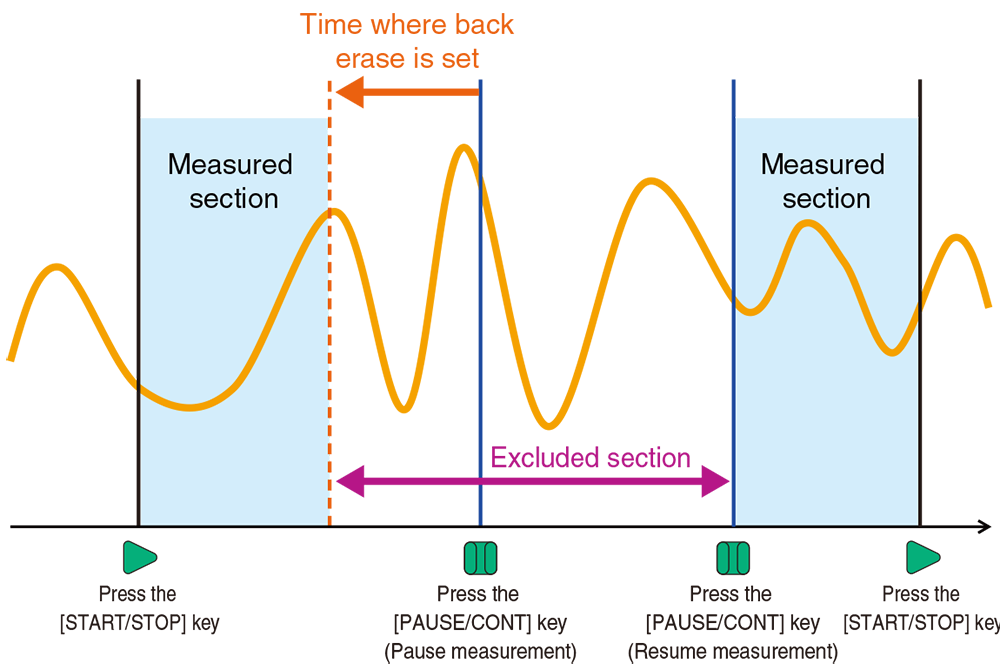
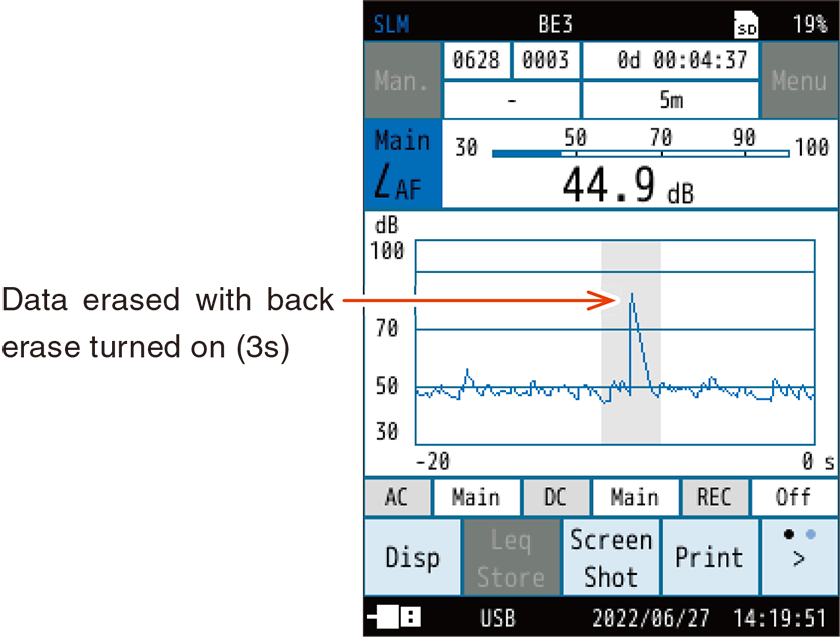
17Set [Back Erase] as necessary.
![Set [Back Erase] as necessary.](../images/10/04_img_17.png)
1. On the [Store] screen, touch [Back Erase].
The [Back Erase] screen appears.
![2. Select the back erase time from Off, 1s, 3s, and 5s, and touch [Apply]. The set time is displayed at the top of the screen.](../images/10/04_img_18.png)
2. Select the back erase time from Off, 1s, 3s, and 5s, and touch [Apply].
The set time is displayed at the top of the screen.
| Item | Description |
|---|---|
| Back Erase | Sets the function to omit data immediately before the interruption in the calculation when the measurement is interrupted. |
Note
- When [Wave Rec. Mode] of waveform recording is [On], the back erase function is disabled (when NX-43WR is installed).
Overview of the back erase function
18 If necessary, touch [Overview] to see an overview of the store.
![If necessary, touch [Overview] to see an overview of the store.](../images/10/04_img_20.png)
![If necessary, touch [Overview] to see an overview of the store.](../images/10/04_img_21.png)
19Touch [Back] or press the START/STOP key to return to the measurement screen.
![Touch [Back] or press the START/STOP key to return to the measurement screen.](../images/10/04_img_22.png)
20Press the START/STOP key to start the measurement.
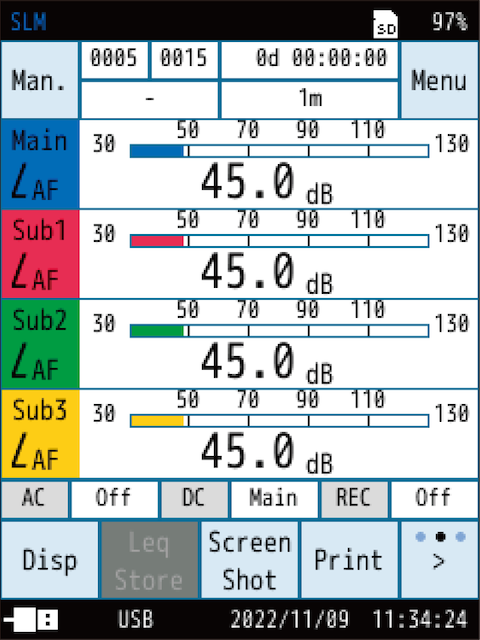
At this point, previous measurement values are cleared.
- The ▶ symbol flashes during measurement, and the elapsed time is displayed. In addition, the indicator LED flashes red.
- The measurement stops automatically when the measurement time specified in 16 has elapsed.
- To terminate the measurement before the set measurement time, press the START/STOP key.
- If an overload signal or under-range signal occurs once or more while measuring, [OV] or [UN] is displayed on the screen. This indicates that the sound level data used in the calculation contains an overload signal or an under-range signal (“Reading the Display”).
- Press the PAUSE/CONT key during measurement to interrupt the measurement. Press the PAUSE/CONT key again to resume measurement.
- When measuring is paused, [II] is displayed on the screen (the time during which the pause and back erase functions are activated is not included in the measuring time).
- If you set the back erase function, you can check the data to be erased on the [Time-Level] screen.
21Touch [Switch display] on the menu ring to switch the display.
![Touch [Switch display] on the menu ring to switch the display.](../images/10/04_img_25.png)
- If the desired calculated quantity is not displayed, make sure that the display setting for the Leq calculation screen is set to [On] (11. “On the [Leq Calc.] screen, set the amount of calculation displayed on the measurement screen to [On].”).
- When [OV] is displayed, this indicates that the sound level used for the calculation contained overload signal data.
- When [UN] is displayed, this indicates that the sound level used for the calculation contained under-range signal data.
Note
- If you touch [Disp] while measuring, you can read the values of each calculation in progress (only level numerical values are displayed, and the bar graph is of the sound level Lp).
- If you change the settings such as frequency weighting (A/C/Z) or time weighting (F/S/I) after taking measurements, the measurement values will be discarded.
Note
- The equivalent continuous sound level (Leq), I-time-weighted equivalent continuous sound level (LIeq), moving Leq (Leq,mov), sound exposure level (LE), maximum time-weighted sound level (Lmax), minimum time-weighted sound level (Lmin), N percentage exceedance sound level (LN), peak sound level (Lpeak), and takt-max sound level (Ltm5) are all measured simultaneously.