8.8 Connection with level recorder or data recorder
Changes in sound levels over time can be recorded by connecting a level recorder to the device.
Waveforms can also be recorded by connecting a data recorder to the device.
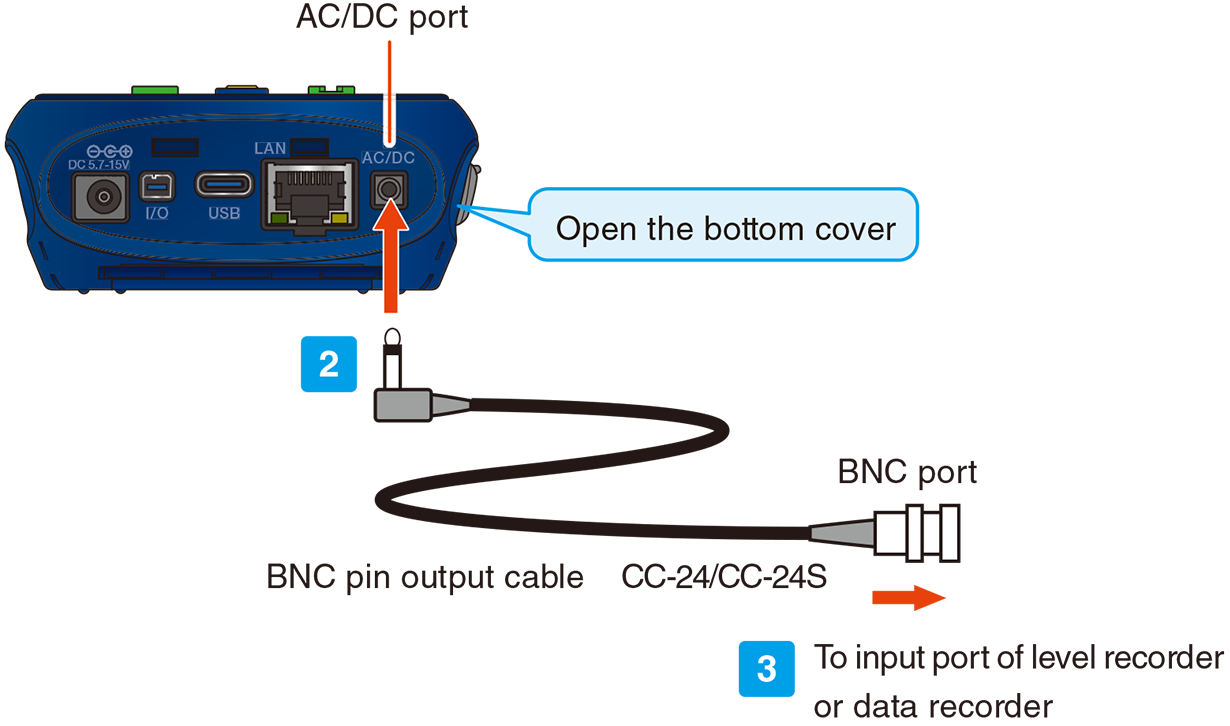
Connect a level recorder (LR-07/LR-20A) or data recorder (DA-21/DA-20/DA-40) and the device with BNC-pin output cable CC-24/CC-24S (optional) as follows.
The level recorder uses analog recording by way of a pen and rolled paper, and the data recorder uses digital recording.
Important
- Operation is not guaranteed with BNC-pin output cables other than CC-24 or CC-24S.
1Open the bottom cover of the device.
2Insert the connector of the BNC-pin output cable into the AC/DC port of the device.
3Plug the BNC port of the BNC-pin output cable into the input port of the level recorder or data recorder.
Sound level recording
Record changes in the sound level over time as follows.
1Turn on the power to the device and the level recorder or data recorder.
Note
- For how to handle the level recorder and data recorder, refer to the instruction manual of each device.
2Connect the device to the level recorder or data recorder (“Connection with level recorder or data recorder”) .
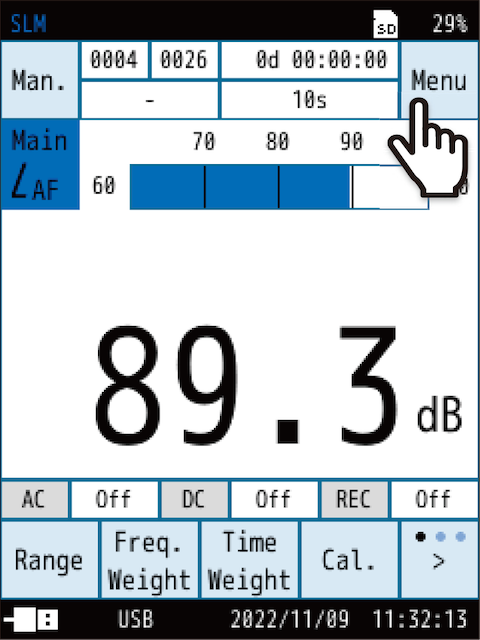
3Touch [Menu] on the measurement screen.
![Touch [Menu] on the measurement screen.](../images/08/08_img_2.png)
The [Menu] screen appears.
4Touch [I/O] on the [Menu] screen.
![Touch [I/O] on the [Menu] screen.](../images/08/08_img_3.png)
The [I/O] screen appears.
5Touch [Signal Output] on the [I/O] screen.
![Touch [Signal Output] on the [I/O] screen.](../images/08/08_img_4.png)
The [Signal Output] screen appears.
6Touch [AC OUT].
![Touch [AC OUT].](../images/08/08_img_5.png)
The [AC OUT] screen appears.
7Select the frequency weighting of the AC signal output to the level recorder or data recorder, and touch [Apply].
![Select the frequency weighting of the AC signal output to the level recorder or data recorder, and touch [Apply].](../images/08/08_img_6.png)
| Item | Description |
|---|---|
| Off | No AC signal is output. |
| Main | Outputs an AC signal corresponding to the sound pressure waveform after frequency weighting. Applies the frequency weighting set in the selected channel. |
| Sub1 | |
| Sub2 | |
| Sub3 | |
| A | Outputs an AC signal corresponding to the sound pressure waveform after frequency weighting. Applies the selected frequency weighting. |
| C | |
| Z |
Important
- The continuous operating time on batteries will be shortened by approximately 30% when this function is used.
8Touch [Back] or press the START/STOP key to return to the measurement screen.
9Touch [Cal.] on the measurement screen.
![Touch [Cal.] on the measurement screen.](../images/08/08_img_7.png)
![Touch [Cal.] on the measurement screen.](../images/08/08_img_8.png)
To calibrate an external device (level recorder or data recorder) a calibrator ( “calibrator / pistonphone” ) or reference signal is output ( “Signal Output” ).
10Adjust the pen to record the position corresponding to the calibration value.
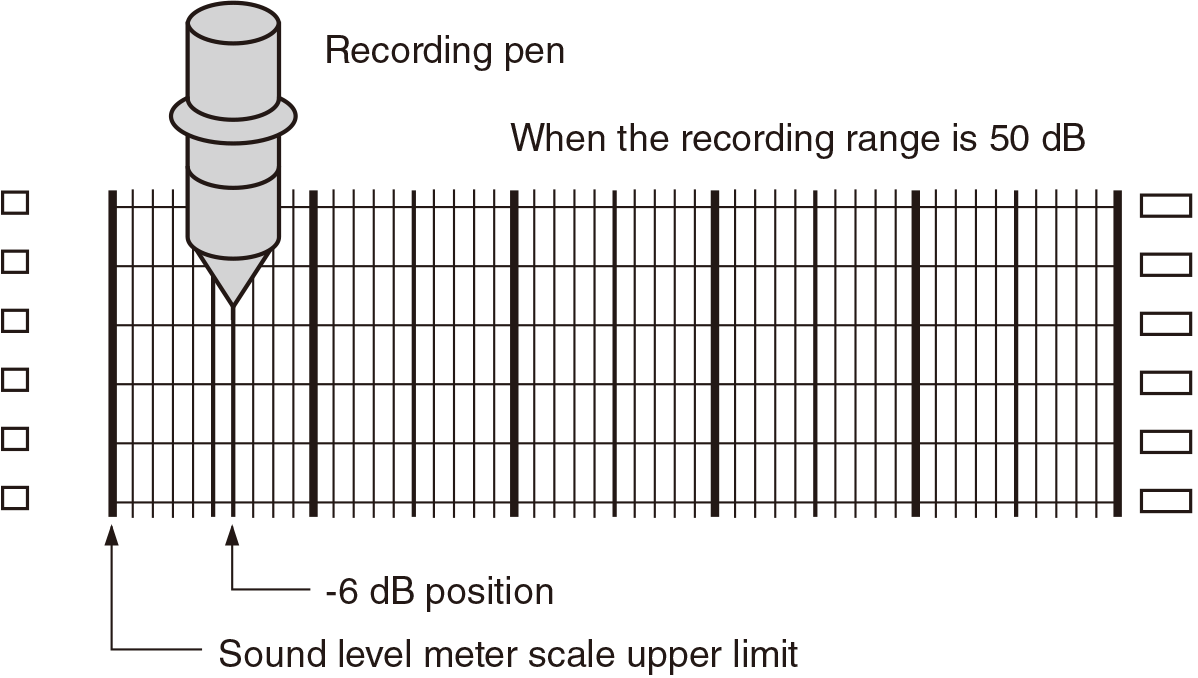
- For example, if the calibration value is 94 dB, adjust the pen to record at -6 dB from the upper limit of the scale.
- For example, if you use a reference signal (-6 dB at the top of the bar graph range), adjust the pen to record -6 dB from the top of the scale.
- If a data recorder is connected, record the calibration signal. For details, refer to the instruction manual of the data recorder.
11Touch [Back] or press the START/STOP key.
![Touch [Back] or press the START/STOP key.](../images/08/08_img_10.png)
The device enters measurement mode.
12Set the output level range on the device.
1. Touch [Menu] on the measurement screen.
The [Menu] screen appears.
![Touch [I/O] on the [Menu] screen.](../images/08/08_img_12.png)
2. Touch [I/O] on the [Menu] screen.
The [I/O] screen appears.
![Touch [Signal Output] on the [I/O] screen.](../images/08/08_img_13.png)
3. Touch [Signal Output] on the [I/O] screen.
The [Signal Output] screen appears.
![Touch [Output Level Range] on the [Signal Output] screen.](../images/08/08_img_14.png)
4. Touch [Output Level Range] on the [Signal Output] screen.
The [Output Level Range] screen appears.
![Select the output level range, and touch [Apply].](../images/08/08_img_15.png)
5. Select the output level range, and touch [Apply].
13Touch [Back] or press the START/STOP key to return to the measurement screen.
Measure and record according to the instruction manual of the level recorder or data recorder.