9 Calibration
Before starting the measurement, calibrate the sound by inserting the microphone of the device into a sound calibrator (NC-75/74, Nor1256)) or a pistonphone (NC-72B/72A).
Adjust it so that the sound level Lp (indicated value) display of the device is equal to the sound level in the coupler of the calibrator.
Note
- For instructions on how to use Nor1256, please refer to the product instruction manual.
- When using a pistonphone (NC-72B/72A), perform sound calibration with the frequency weighting of the main channel set to Z or C.
- We recommend regularly calibrating the sound calibrator and pistonphone.
- You do not need to change the bar graph's upper and lower limits on the device to match the sound pressure level of the calibrator.
- For details on how to calibrate using a sound calibrator or pistonphone, refer to the respective instruction manuals.
- Perform sound calibration with the microphone of this device horizontally inserted all the way into the sound calibrator or pistonphone.
1Check that the power switch on the sound calibrator or pistonphone is turned off.
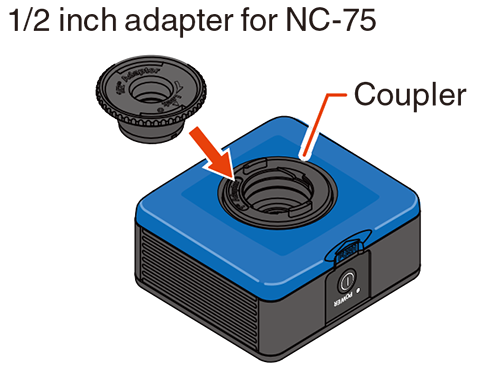
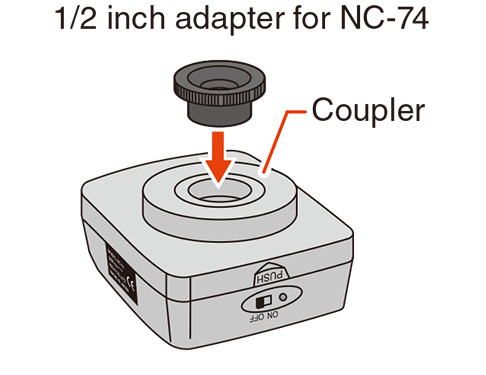
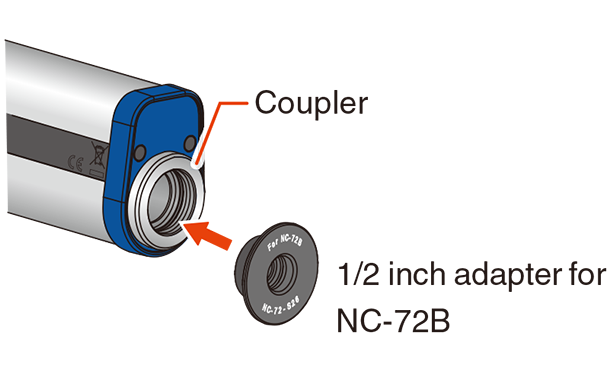
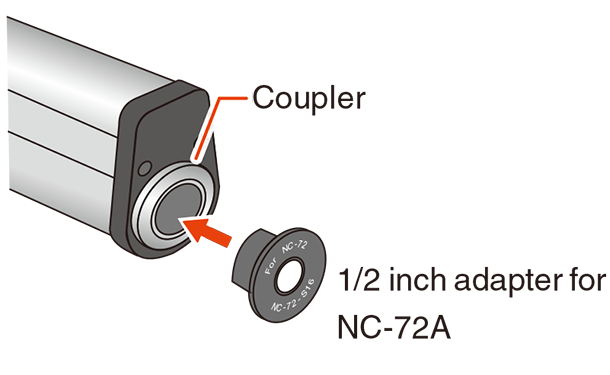
2Attach the 1/2 inch adapter to the sound calibrator or pistonphone coupler.
-
Sound calibrator NC-75
-
Sound calibrator NC-74
-
Pistonphone NC-72B
-
Pistonphone NC-72A
3Gently and slowly push the microphone of the device until it hits the back of the coupler.
Important
- Attach the sound calibrator or pistonphone to the microphone gently and slowly.
- If it is pushed in or pulled out suddenly, the air pressure inside the coupler will change significantly, which may damage the diaphragm of the microphone.
- When attaching or detaching the calibrator, do not rotate the device or the calibrator. Rotating the device or calibrator may loosen or dislodge the microphone grid and damage the microphone diaphragm.
4After inserting the microphone, wait a short while and then read the indicated value on the device.
Note
- Accurate calibration cannot be performed immediately after the microphone is inserted because the air pressure inside the calibrator and microphone has changed. It takes up to 30 seconds for the air pressure to stabilize and the microphone performance of the device to stabilize. As for the time required for the inside of the calibrator to stabilize, see the instruction manual of each sound calibrator.
5Turn on the power switch of the sound calibrator or pistonphone.

6Wait until the indicated value on the device settles before reading it.
Check that the sound calibrator (NC-75/74, Nor1256) exceeds the value read in step 4 by 20 dB or more and that the pistonphone (NC-72B/72A) exceeds the read value by 30 dB or more.
Note
- If this difference is less than 20 dB for the sound calibrator (NC-75/74, Nor1256) and less than 30 dB for the pistonphone (NC-72B/72A), the surrounding environment noise will affect the calibration, and you will be unable to calibrate accurately.
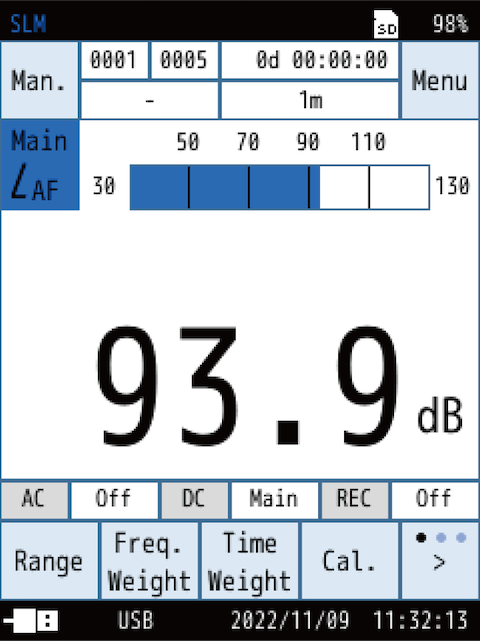
7To adjust the indicated value, touch [Cal.].
![To adjust the indicated value, touch [Cal.].](../images/09/01_img_9.png)
![To adjust the indicated value, touch [Cal.].](../images/09/01_img_10.png)
- If there is no difference between the indicated value and the calibrated value, or if you do not adjust the indicated value, the calibration procedure concludes here.
- Touch [+Gain] and [-Gain] so that the indicated values become the following calibration values.
| Model | Calibration value |
|---|---|
| NC-75/74 | NL-53: 94.0 dB |
| Nor1256 | Refer to the instruction manual |
| NC-72B/72A | Refer to the respective instruction manuals |
Note
- Calculate the generated sound pressure level by substituting the following into the formula described in the NC-72B/72A instruction manual.
- Specified sound pressure level on the calibration chart that comes with the NC-72B/72A (nominal value is 114 dB)
- Compensation value for effective load volume of the microphone (-0.07 dB)
- Static pressure at time of use
8Touch [Save Cal.].The calibration value is saved.
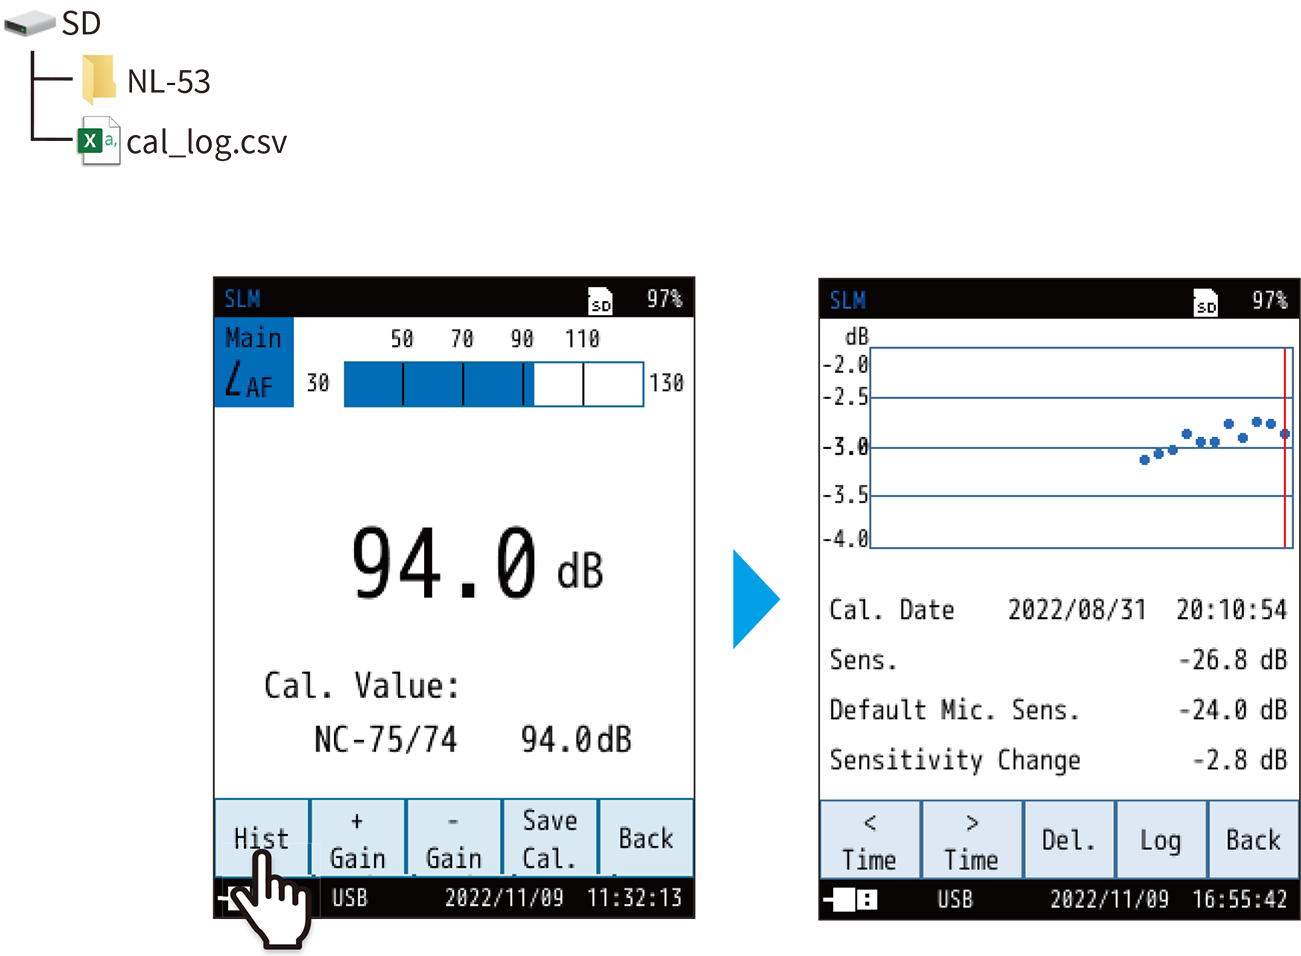
Hist
- Touch [Hist] to check up to 30 past calibration data items.
- Touch [< Time] or [> Time] on the menu ring to display the calibration value for the date and time you want to check.
- If you touch [Output History] on the menu ring, you can save the history to the SD card.
- History data is saved in CSV format to the following location on the SD card.