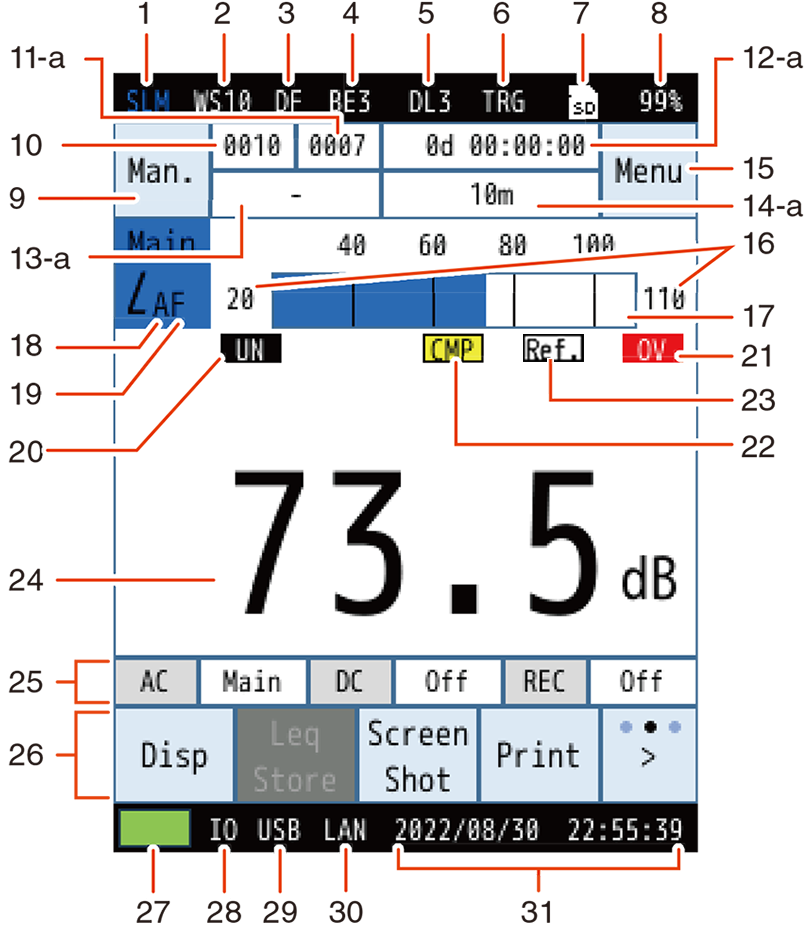
5.1 Sound level screen (main channel display)
Note
- While the actual display may not look exactly like those in the figures below, the explanation is based on the assumption that the same text will be displayed.
Manual
![]()
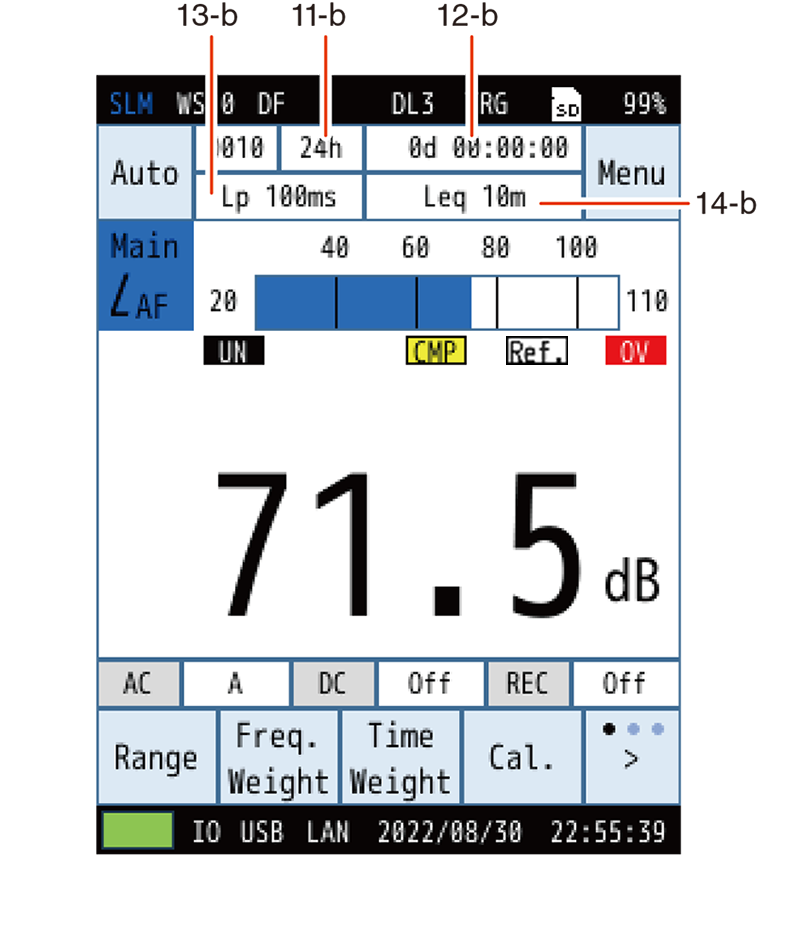
Auto or Timer Auto
| No. | Name | Description | ||||||||||||||||||||||
|---|---|---|---|---|---|---|---|---|---|---|---|---|---|---|---|---|---|---|---|---|---|---|---|---|
| 1 | Measurement mode | Displays the measurement mode. | ||||||||||||||||||||||
| 2 | Windscreen correction | Displays the windscreen model set with the windscreen correction function. | ||||||||||||||||||||||
| 3 | Diffuse sound field correction | Appears when diffuse sound field correction is set to [On]. | ||||||||||||||||||||||
| 4 | Back erase function (Manual) |
Appears when the back erase function is set to 1s, 3s, or 5s. | ||||||||||||||||||||||
| 5 | Delay measurement function | Displays the time (seconds) set with the delay measurement. | ||||||||||||||||||||||
| 6 | Trigger mode |
Appears when the measurement start trigger is set. | ||||||||||||||||||||||
| 7 | SD card | Appears when an SD card is installed. | ||||||||||||||||||||||
| 8 | SD card remaining capacity | Displays the remaining capacity of the installed SD card. | ||||||||||||||||||||||
| 9 | Store mode | Displays the store mode when saving to memory. There are three store modes: Manual, Auto, and Timer Auto. |
||||||||||||||||||||||
| 10 | Store name | Displays the store name. | ||||||||||||||||||||||
| 11-a | Address (Manual) |
Displays the memory address. If there is already data at that address, this will be displayed in red. |
||||||||||||||||||||||
| 11-b | Total measurement time (Auto) |
In the Auto store mode, displays the total measurement time. Not displayed in Timer Auto mode. |
||||||||||||||||||||||
| 12-a | Calculation / measurement elapsed time (Manual) |
Displays the elapsed time since starting measurement in hours, minutes, and seconds. | ||||||||||||||||||||||
| 12-b | Measurement elapsed time (Auto, Timer Auto) |
Displays the elapsed time since starting measurement in days, hours, minutes, and seconds. |
||||||||||||||||||||||
| 13-a | ---- | Not displayed in Manual Store mode. | ||||||||||||||||||||||
| 13-b | Lp store interval (Auto, Timer Auto) |
When the store mode is set to Auto or Timer Auto, the set Lp store interval is displayed. |
||||||||||||||||||||||
| 14-a | Calculation / measurement time (Manual) |
Displays the total measurement time set in the store settings. | ||||||||||||||||||||||
| 14-b | Leq calculation interval (Auto, Timer Auto) |
When the store mode is set to Auto or Timer Auto, the set Leq calculation interval is displayed. |
||||||||||||||||||||||
| 15 | Menu / Pause / Measurement status |
Touch to display the [Menu] screen.
* The [Menu] screen is also displayed when you touch [Man.] in the upper left of the screen. |
||||||||||||||||||||||
| 16 | Bar graph range | Displays the values from the lower limit to the upper limit of the bar graph. The range can be changed via [Display] in the [Menu] screen. | ||||||||||||||||||||||
| 17 | Bar graph | Displays the sound level as a bar graph (updated every 0.1 s). | ||||||||||||||||||||||
| 18 | Frequency weighting | Displays the frequency weighting set for each channel.
|
||||||||||||||||||||||
| 19 | Time weighting | Displays the time weighting set for each channel.
|
||||||||||||||||||||||
| 20 | Under-range indication |
|
||||||||||||||||||||||
| 21 | Overload indication |
|
||||||||||||||||||||||
| 22 | Comparator |
|
||||||||||||||||||||||
| 23 | Reference signal output |
|
||||||||||||||||||||||
| 24 | Lp value display | Displays the sound level for each channel (updated every second). | ||||||||||||||||||||||
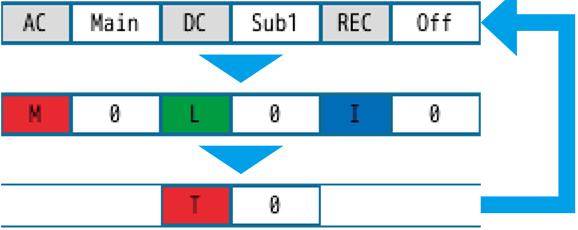
| 25 | Information display bar | Each time you touch the [info] on the menu ring, the displayed information will switch.
|
||||||||||||||||||||||
| 26 | Menu ring | Each time you touch [>] on the far right of the menu ring, the displayed menu switches.
|
||||||||||||||||||||||
| 27 | Battery level / Power status | Displays the power status.
|
||||||||||||||||||||||
| 28 | I/O communication | Appears when [I/O Port] is set on the [I/O] screen. | ||||||||||||||||||||||
| 29 | USB communication | Appears when USB is set on the [I/O] screen. | ||||||||||||||||||||||
| 30 | LAN communication |
Appears when LAN is set on the [I/O] screen. | ||||||||||||||||||||||
| 31 | Date / Current time | Displays the current date and time. |


![Each time you touch [>] on the far right of the menu ring, the displayed menu switches.](../images/05/01_img_6.png)


Please scroll left and right to see the table.
Note
- When operating the device with just an external power supply, if the device is turned off when the external power supply turns off, the auto-, file-closing and auto-shutdown operations will not be performed, and so we recommend installing new batteries in the main unit. However, make sure to set the power-on mode switch to the A side (“Turning on/off the power”).